Little things

Just a few things I thought I’d put in one post.

First up, as some of you may recall, I covered Nissin’s Cup Noodle campaign with Bandai that featured the world’s smallest Gunpla.  Well part two of that campaign kicked off on Monday, which was a Char specific cup with refillable noodle packs.  While the noodles don’t get ready 3 times faster than they normally would, the cup in itself is neat.  I actually love the packaging on this one, as they have a giant quote of Char’s in English on the top.  Somehow it comes off much… cooler in English.  “Don’t take it personal Garma, You can thank your father for this” cold blooded man.

Packagedstuff70

The top, all in Englishstuff71

And unpackedstuff72

This runs about 10 bucks which gets you the glass and one noodle packet.  Haven’t actually eaten the noodles yet, that’ll probably be tomorrow.

Next up, a first that will suprise many.  I actually got some Gundam tools from… America! 

The tools in questionstuff74

You’re looking at 5 Gundam Markers, the Plated Silver (Mekki Silver in Japanese) that Lupes at It’s a Gundaaaam was kind enough to send me.  The reason being?  Well, the plated silver Gundams are probably one of the most useful markers out there due to the fact they look really good! And can be used for vital things such as pipes, weapons, and more importantely, trim on Katoki kits such as the Sinanju and Kshatriya.  So why get them from America?  Because they’re no longer made!  Amazingly enough, I totally missed out on this news, but apparently they stopped making them for some reason or another around January of this year, and by the time I started looking around, the stock was all gone in Japan.  I was told even in Akiba that people pretty much bought them by the box once the news was out that production was stopped. 

So, for those interested, your best bet will be to get them from a foreign supplier, as Japan doesn’t have anymore!

Lastly, you may have noticed something in the first few pictures, mainly a white background.  There are two reasons for this.

Those being…stuff73

I finally got a new light, the old one just wasn’t handling it, of course that’s what I get for buying a really cheap light a year ago.  This time I went middle of the road (which isn’t saying much, because lights are freakin expensive here!) and got a nice work lamp.  I also invested in a giant sheet of paper, this I bought at the 100 yen store, a movie poster sized piece of paper.  Combined with the light, I should be able to take much better shots!  Just to give you an idea….

Trying an artistic shotsinanju101

Checking out the thrusterssinanju100

Finally getting that blue to popsinanju102

Now I have little excuse to actually finish taking good shots of the Sinanju, and officially closing the book on it.  Save time that is…

SGB WiP – Sinanju #8

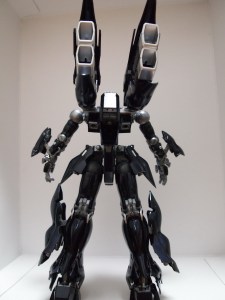
The first gallery, the general body from all sorts of angles.  Next up I’ll try and focus on more of the details. 

SGB WiP – Sinanju #7

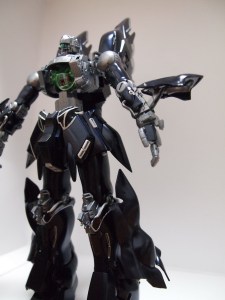
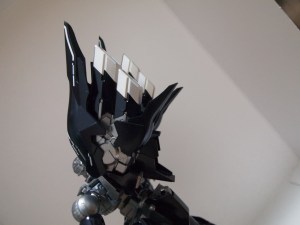
And after nearly 10 weeks, the summer project has finally come to an end!  After around 15 cans of paint, gloss, top coat, various AM parts, and waterslide hell, it’s almost time to close this chapter of in my Gunpla history book.   It’s been a pretty amazing build that was definitely made easier and funner thanks to the all my fellow Gunplars participating in this Sinanju Group Build put on by Gundam Australia.  Now all that’s left is the photo shoot and my final thoughts.   My next problem is that the Sinanju is simply a beast, so now to figure out how take really good shots without all m other crap getting in the way.  Anyways, here’s some preview shots for you!

SGB WiP – Sinanju #5.5

We had some decent weather on Saturday, so I sat down to knock out painting another batch of parts. I did all the black parts, followed by a majority of the red parts.  All that’s left is about 15~20 of the small red pieces, the waist and head piping, thrusters, and weapons.  Actually, saying that, I realize I’m still not anywhere near done, but today I’m going to go ahead and do the big reveal on the colors, or at least the main ones.  

So for the materials, I’m using the following colors: 

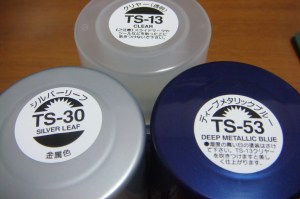
  • Red pieces:                  Tamiya Color Spray TS53 – Deep Metallic Blue + TS13 Clear Glossy
  • Black pieces:               Tamiya Color Spray TS64 – Dark Mica Blue + TS13 Clear Glossy
  • Gold pieces:                Tamiya Color Spray TS30 – Silver Leaf
  • Inner frame:               Tamiya Color Spray TS42 – Light Gun Metal

 sinanju22

Additionally, I’ve used the Metallic Silver Gundam Marker for some additional areas, mainly the little cylinder pipe that is used in the back of the foot.  Having near finished the leg parts, I’m debating on going back and highlighting the back of the knee as well as the tiny little thruster outlets on the left/right side of the calves with it or the Silver Leaf.  

I’m planning on using the following colors as well for other parts:

  • Thrusters (outer bell)     Tamiya Color Spray TS71 – Smoke
  • Thrusters (inner bell)      Haven’t decided, maybe silver leaf
  • Weapons                               Tamiya Color Spray TS38 – Gunmetal
  • Power cables                       Haven’t decided, either silver leaf, light gunmetal or smoke
  • Booster tanks                      Haven’t decided, probably light gunmetal or gunmetal

Looking back, I think I could have used Mica Silver or Metallic instead of Silver Leaf Silver since my other main colors are metallic and mica flavored, but I was really impressed by Gaijn Gunpla’s Silver Leaf Shin Musha Gundam that I wanted to give it a go. 

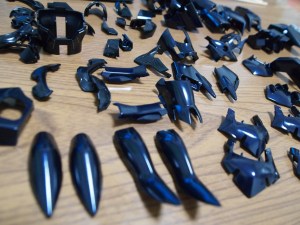
A few notes about the colors I’m using.  Metallic Blue really needs a few layers of coat on it to bring out it’s shine.  It’s good to also throw a coat of glossy clear on it afterwards as well to help make it glow.  The Dark Mica Blue on black is really close to black so it may be hard to tell in the pictures, but up close it has really nice sparkles as well.  I’ve put a coat of glossy clear on these pieces as well.  Overall, the biggest problem with these two main colors though is they tend to be affected by humidity.  I discovered that painting on a humid day would make the colors come out flat, which would require more coats to get it up to spec.  Unfortunately the summer weather has not been so summer like, which means I’m facing 90% humidity some days.  Saturday afternoon it dropped down to around 65% so I went for it, and managed to get great results on just the initial coats of color.   I let them sit and taking a look in the evening and man don’t they look nice.

sinanju24

 sinanju25

Next up is going to be the painting of the silver lines on the black pieces.  I decided to hand paint because masking would drive me insane.  I may end up masking though because I really my brush technique sucks completely though.  I went and sprayed a bunch of silver leaf into a spare jar to pool it up, and tried painted a few pieces, but it’s kinda eh.  After having the main armor come out really nice, I don’t want to have the look ruined by a crappy hand painting job. 

Anyways, all together the feet, arms, back thruster set is done.  The legs are done save for the knee parts.  I’ve been putting waterslides on parts as well as I’ve gone, but that’s going to take a while in itself.  So, now that I’ve revealed the colors, let’s see how what I’ve got done looks.

From the frontsinanju26

Side anglesinanju27

Back thrusterssinanju28

Back shotsinanju29

Unfortunately it looks like crappy weather this week (yay, typhoon, fun for all) mixed in wtih the summer holidays means that most likely nothing else is going to get done this week painting wise.  Guess that will give me some quality waterslide application time!

——- E D I T ——-

Just to give you guys a clearer idea of the metallic blue, here’s a closer up shot of the boosters I took last week.

 sinanju21

SGB WiP – Sinanju #4

We had great weather this weekend which allowed me to get ahead on painting.  First off though, we have to put the new waist together.  I went ahead and shaved the peg down on two sides to give it a little more movement and to prevent breakage.

Hard to tell, but slight shaving of two sidessinanju10

With the waist put together, I finished the painting of the entire inner frame.

Piled togethersinanju11

And the finished frame is as follows:

Backsinanju12

Sidesinanju13

Frontsinanju14

Kneelingsinanju17

Now, we all know Sinanju is a big mother, but it’s always fun to compare! And while Exia is still not fully built, it is easy to tell that Sinanju stands head and shoulders above Exia.

Front comparisonsinanju15

Back comparisonsinanju16

As for the outer armor, I’ve started painting from the feet. At first I was worried that the colors chosen for black and red would be too similar, but after putting the feet together, they came out really nice. Still a little too early to reveal the colors here though! I finished painting up the leg armor next today, and will put the legs together over the week. Depending on weather, I may be able to work on painting the other parts as well over the week. We’ll see how it goes.